Showing posts with label Mental Ray. Show all posts

Saturday, September 5, 2009

Linear Workflow in Softimage

Softimage have great options to work in a Linear Workflow (LWF), in this post I will explain how to setup Softimage Preferences to work with the Physical Sun and Sky setup

By default Softimage is setup to render in a non-physical way, when using a Physical setup you need to change these option to make sure that all you color swatches and textures are linearized.

Here is the scene setup.
The diffuse value of the green sphere.


The texture connected in the diffuse slot of the sphere to the right.


In the preferences, the Color profile for the texture is set to Linear and the Color Management is not active. Rendering the scene with a gamma of 2.2 in the Photographic Exposure shader give you this.
Everything is washed out!  The typical non linear render. 
Notice how the green of the sphere doesn't match the color swatch of the shader and how the texture is washed out.

We can fix this quite easily.

In the Preferences, in the Rendering section, under the Image tab, set the Color Profile to Automatic.
The automatic Mode will linearize sRGB image and keep high dynamic range image linear. You can also change this in the each image clip.

You will also need to enable the Color Management in the Display section of the Preferences


In the Photographic Exposure shader you will need to set the gamma to 1.0. Since Softimage is now in charge of the gamma, you can remove the gamma from the exposure shader.

Now when you render you will get a a better result in the UI.


You might have noticed that the green color swatch in the shader now match the render result. This is exactly what we want, now the color you set in your swatch match the render... how wonderful!

But if you render the current pass to disk in a 8 bit format, when you look at the renders everything is darker...


This is because Softimage Color Management is only applied in the UI, when you render to disk the gamma is not applied to the output. This is quite useful when doing compositing because you are not dealing with baked-in gamma.  All you need to do is apply a 2.2 gamma at the end to get the proper result.

In a comment of my previous post, Edin pointed out that it is possible to apply the gamma when rendering out to disk. In the pass option, locate the Pass Gamma Correction section and enable the Apply Display Gamma Correction


You end up with this result.


For some reason the gamma not applied to the environment ... this is not a big deal because you will rarely use the physical sky as your background. But it is something to keep in mind when using this pass option.

I hope this little tutorial was helpful. Feel free to point out any errors or omission in this post ... or even suggest alternative methods.

Finally, here are 2 links that you might find useful. They discuss LWF in Softimage and in Vray
http://community.softimage.com/forum/autodesk-softimage/rendering/softimage-gamma/page-1/
http://www.aversis.be/tutorials/vray/essential_gamma_01.htm

Friday, September 4, 2009

Physical Sun and Sky in Softimage

If you have used the Physical Sun and Sky in Maya and Softimage, you may have noticed that in Softimage the setup is halfway done. Only the sky is created, no lens shader is used and the Sun is using a soft light shader instead of the physical sun shader.

If you want to have a setup similar to Maya you have to connect everything manually. I got tired of connecting all the shaders manually so I have modified the Initialize sky shader script to include all those changes.

Once installed (see Softimage Help on how to install addons) you will have a new entry in the Pass > Edit menu : Initialize Physical Sun/Sky Shader
The Initialize window is similar to the default Initialize Sky Shader window. Choose your pass and you sun light then click Apply.
The plugin will create the physical Sky shader in the pass environment stack.
It will also add a photgraphic Exposure shader in the pass lens stack and set the pass lens stack mode to Add After Camera Lens Shaders.
And most importantly it will add a Physical Sun shader in the light shader, replacing the default soft light shader.


Now you have all the proper shaders to create physically accurate renders.
But some of the default values in these shaders are not correct, the plugin will take care of adjusting them correctly.


In the Physical Sun shader you will notice that most properties are controlled by an expression, exactly like in Maya.

You can edit the shadow softness and shadow samples of the Sun in this shader.


Most of the values in this shader need to match the value of the Physical Sky shader exactly. Connecting these values with expression is the easiest way to keep these values linked.

In the Physical Sky shader, the multiplier values is set to 1 instead of 0.1 and the rgb Unit Convertion is set to 0.318

As mentioned in the Sun and Sky Mental Ray documentation:
When setting the rgb Unit Convertion values to 0.318, the final rendered pixels in the image are true photmetric luminance values in candela per square meter.

These true luminance values then fit perfectly as input to the photographic tone mapper.


For the Photographic Exposure shader, the plugin sets the F-Stop Number to 16 and the c/m2 Factor to 1.
Setting the c/m2 Factor to 1 is important to stay in true photographic mode. 
These setting represent the Sunny 16 rule in photography. As discussed in the Physical Exposure Mental Ray documentation.

To adjust the brightness of the image you can simply adjust the Shutter Time and the F-Stop.


Note that the gamma value is set to 2.2. It is possible to work in linear workflow in softimage, but I decided to keep the values to the Mental Ray default.

I will discuss linear workflow using the Physical Sun and Sky in a future post ... so stay tuned.


Finally the plugin sets 2 more things: it enables the Final Gathering and set the Ambiance Color to Black. (Don't forget to set the Final Gathering for the Region Render as the plugin do not set it) 


With this setup you will have the exact same setup as Maya ... If you downloaded the Maya modification script provided in the previous post and you create a physical sun and sky setup using the Photographic exposure.


Here are renders done in Maya 2010 and Softimage 7.5. Both renders are using the default Physical Sun and Sky settings mentioned in this post and mia_materials (architectural shader).

Maya 2010


Softimage 7.5

As you can see the result is similar in both application.


I hope you like this plugin.

Monday, August 31, 2009

Maya Ambient Occlusion tips

You may have notice 2 strange attributes in the mib_amb_occlusion texture in Maya Id Inclexcland Id Nonself.

If you look in at the mib_amb_occlusion docs in the mental ray documentations, you can see the description of those attributes.

So with these you can include or exclude objects with a given id... or even force given object to cast AO on other objects but themself... this looks cool! so what appends when you set a value in there? You lose the occlusion or there are no changes right?

That's because these values are mental ray ids and you need to assign a mental ray id to your objects ... but how can I do this do you ask?

You need to add an extra attributes named miLabel to the transform nodes of your objects and set the id in this miLabel attribute.
But I need to add this attribute on all my objects manually you ask again? of course not! Use this script (see the readme file in the zip for installation and usage)

Now you can take advantage of this feature!

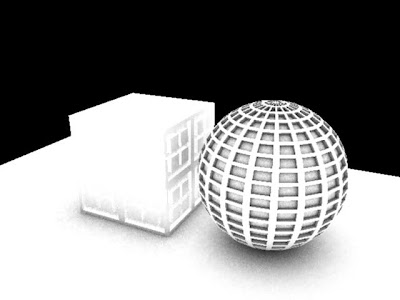
In this example I have added the miLabel attribute to all the objects, I have set the miLabel of the ground plane to 1, the cube to 2 and the sphere to 3. All the obejcts are assign to the same constant shader using the mib_amb_occlusion texture as color.
Here are different results when setting each value in the mib_amb_occlusion texture.

Id Inclexcl: 0 Id Nonself: 0
(both feature disabled)

Id Inclexcl: 2 Id Nonself: 0
(include only objects with id 2)

Id Inclexcl: -2 Id Nonself: 0
(Exclude objects with id 2)

Id Inclexcl: 0 Id Nonself: 2
(Objects with id 2 do not cast AO on themself)

Note that the use of the number 2 is arbitrary, I could have used 34 as my id on the cube and use 34 or -34 as a id value in the mib_amb_occlusion shader.

I hope this tips can help you achieve some tricky Ambient Occlusion renders.

I would like to thanks Daniel Kvasznicza http://www.inetgrafx.com for pointing this out to me.

Sunday, August 30, 2009

mip shaders in Maya 2010

As you might know the mip shaders are not exposed by default in Maya, this is still true in Maya 2010.

I have modified the factory script mentalrayCustomNodeClass.mel to expose all the mip shaders in Maya.


Tuesday, August 25, 2009

Progressive Rendering script Update

I have updated the Progressive Rendering script. You can download the new version on highend3d by following this link:
EDIT:
Here is the link to download the script on the new creativecrash.com sit (prev iously highend3d.com)

The main change is the render window integration. I have added an icon directly in the render window to enable or disable the Progressive Rendering

You can also display the Options UI by right-clicking the icon

I hope you like this update.

Good progressive renders to you all :)

Thursday, August 20, 2009

Tutorial on mip shader in Softimage

Digital Tutors launched their new online tutorial library. This new learning platform is extremely well done, watching tutorial online beats buying DVD's in my opinion.

You can register for a free trial here http://www.digitaltutors.com/09/register.php

In the free tutorial you can watch 8 videos on using the mental ray production shaders in Softimage. I found these tutorials interesting.

I played with the mip shaders before, but I still learned a few thing in these tutorials.

Mental Ray Progressive Rendering in Maya 2010

Maya 2010 comes pakaged with Mental Ray 3.7.53
This version of Mental Ray have a really cool new feature called the Progressive Rendering.
This feature is not yet implemented in Maya 2010, but fortunatly for us Autodesk designed the string options.

With the string options, you can add any Mental Ray options and set it's value then Maya will pass this information to Mental Ray enabling the Mental ray feature! This is great because Maya users don't have to wait for Autodesk to implement new Mental Ray features.

Of course using the string options are not very user friendly ... that's why I have create this script to add the string options to enable Mental Ray's Progressive Rendering.

You can download the script here.


Install the script an execute it ...
This little window will appear, enable the Progressive Rendering and start a render or an IPR!
Adjust any of the options from this window instead of having to edit string options manually.

The Progressive Rendering works like a charm in IPR, tweak your lights and material faster than before!

Enjoy!